Care / Declining plants
Terrarium plants dying? Check the roots, leaves, and recent changes
Use the pattern of damage and a few physical checks to choose what to correct, what to leave in place, and when to take a plant out.
By Terrarium GuideSources & editorial method
The short answer
Wilting or yellow leaves do not tell you whether to add water. Check moisture around the affected roots, the stem base, leaf undersides, and recent light or temperature changes. Water a root zone that is too dry for that plant; withhold extra water from wet roots and inspect a soft base or continuing collapse.
Move a humid terrarium out of direct sun or other damaging heat promptly. Separate a plant with suspected pests or spreading decay where practical. One aging lower leaf can be ordinary turnover; worsening damage across the plant needs a closer check.
Choose the first action before adding anything
- A hot position, soft base, or rapid collapse
- Act on the immediate problem
- Check
- Is direct sun heating a humid jar? Is the stem base soft, or is the plant worsening while its roots are wet?
- Action
- Move the humid display to suitable indirect light away from heat. Pause water to already wet roots. Inspect the affected plant and take it out if decay or access requires it.
- Stop or reassess
- Do not wait for another watering day while tissue collapses.
- Wilting, yellowing, or browning without collapse
- Match the symptom to a physical check
- Check
- Compare root moisture, where the damage starts, recent moves and nearby plants.
- Action
- Use the table below. Correct a demonstrated mismatch; a yellow leaf alone does not justify fertilizer, more water or a spray.
- Stop or reassess
- Softening, spreading damage or pest evidence calls for closer inspection.
- One older leaf or a known seasonal change
- Check the rest of the plant
- Check
- Are the remaining leaves, growing center and required root conditions intact?
- Action
- Remove loose dead material and observe. Check the identified plant’s life cycle before trying to force new growth.
- Stop or reassess
- New leaves or the growing center deteriorate, or damage keeps spreading. Do not assume every decline is aging or dormancy.
Scope and important limits
A useful fit when
- Checking declining plants in accessible terrestrial terrariums and open glass displays.
- Choosing an initial corrective action and deciding whether the plant can stay in the arrangement.
Use another path when
- Identifying a pathogen or insect from leaf color alone.
- Animal enclosures, aquatic plants, or a universal rescue recipe for every species.
This guide applies published horticultural advice to the stated arrangements. The illustration is a teaching example; this page does not report a site growing trial.
Use a second check to separate similar symptoms
| What you see | Check next | First useful action |
|---|---|---|
| Wilted or lowered leaves | Actual rootball moisture, including below surface decoration; inspect the base if roots are wet. | If too dry for the plant, use its watering method. If wet, pause additions and inspect roots rather than repeat a dose. |
| Several leaves yellowing or dropping | Which leaves, how quickly, root moisture, recent moves, and leaf undersides. | Correct the observed water or environment mismatch. Separate a pest-affected plant; do not diagnose a nutrient shortage from yellow alone. |
| Brown, crisp tips or edges | Root dryness, a newly opened cover or dry draft, heat, and recent feeding. | Restore the plant’s required root moisture and air conditions. Wetting an already wet bed will not correct dry air or salt injury. |
| Bleached or brown patches after a move | Whether direct sun or a changed lamp reaches the affected surface; also check cold exposure or spray history. | Remove the damaging exposure and restore suitable conditions. Spots alone do not identify an infection. |
| Long weak shoots, leaning or fading growth | Light at the actual leaves, including shading by larger neighbors. | Restore suitable light gradually and make room. Avoid a sudden move from shade into strong sun. |
| Fine speckling, webbing, sticky deposits or cottony clusters | Leaf undersides, leaf joints and shoots with a hand lens; look for the organism. | Separate and identify before treatment. Use the pest check below. A white patch can have several explanations. |
| Darkening soft crown or deteriorating roots | Tissue condition and damage progression outside the display where possible. | Inspect now. Remove severely affected material and correct the root arrangement; ask for help if the cause or viable tissue is unclear. |
Evidence[2][4][6][5][8][13][3]
- Check root moisture before choosing a watering action Compare the affected rootball with the surrounding bed or separate pot.
- Remove unwanted collected water Use a visible safe access route; opening the lid cannot create drainage.
- Check the actual daylight and heat exposure Trace the window position and light at the leaves.
Look at the whole display before disturbing roots
Record what you can see first. Several factors can operate together; a plant can have both root stress and pests.
Find the rootball and stem base
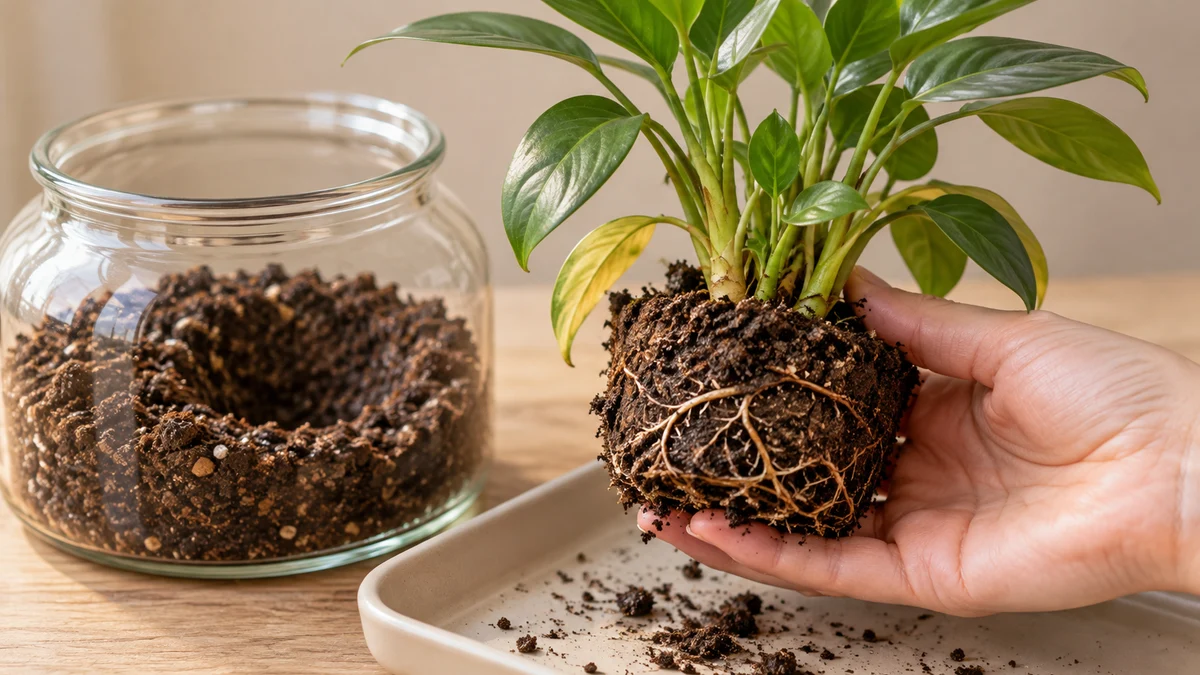
Inspect roots and the crown when decline warrants it
Use this for wet-root wilt, a soft base, continued decline, or a root zone you cannot assess in place. A single stable aging leaf does not require uprooting. The crown is where the shoots meet the roots.
Support the roots instead of pulling the foliage
Lift the rootball with its medium supported. If roots or the opening prevent safe removal, stop pulling and change the access or arrangement. Examine outside the glass in suitable conditions without leaving sensitive roots exposed unnecessarily.
Compare roots, medium and stem bases
Look for soft, deteriorating roots, lost outer tissue and a collapsing or discolored base. Use texture and progression alongside color; soil-covered or naturally colored roots are not automatically rotten. Do not strip every root bare just to match the illustration.
Choose separate care, removal or help
Keep viable tissue in a clean arrangement with the identified plant’s suitable medium and water conditions. Remove severely decayed plants. If only part is affected, use that plant’s supported repotting or propagation method; do not make an arbitrary cut through an unfamiliar crown.
- Find the named plant’s care and propagation guide Use its anatomy, medium and seasonal requirements.
Inspect leaf undersides before choosing a pest treatment
Use a hand lens to check undersides, leaf joints and shoots for organisms, eggs or webbing. Sticky deposits and discoloration guide the search. Take a close photo and identify what is present; not every tiny organism in the medium feeds on living leaves.
Separate a pest-affected removable plant and inspect neighbors. For a minor identified infestation, plant-appropriate physical removal or wiping can help; protect fragile or hairy foliage and keep wash water outside the display. Clean hands and tools before handling another plant.
Do not mix household soap or improvise a treatment inside the jar. Any product must be appropriate for the identified pest, plant and place of use, with its actual label followed. Get local horticultural advice if identification or safe handling remains unclear.
- Compare fuzzy growth, powder and cottony insects Use location and tissue checks before treating a white patch as mold.
Change an arrangement that keeps causing the same damage
Growing room, shared roots and access
Check whether larger foliage shades the affected plant or blocks access. If roots fill a small pot, the crown is compressed, or a spreading neighbor occupies its space, change the planting or move the plant to suitable separate care. Repeated trimming cannot make incompatible root-water needs identical.
For drying-root succulents, use an accessible arrangement that actually drains and permits the required drying. A top opening alone cannot empty solid glass. For soil-free air plants, check the base and support, and use their separate removal, drainage and drying route rather than a soil-root inspection.
Feeding history and deposits
Brown tips and weak growth can accompany excess soluble salts as well as other stresses. Note recent fertilizer and water history. Pause further feeding while checking roots and conditions; yellowing alone does not establish a deficiency.
If salts are the supported problem, a suitable draining pot can be leached outside the glass, or the plant can be repotted into appropriate fresh medium. Do not pour a pot-flushing volume into a sealed-bottom bed. Follow specialist water and nutrient requirements for carnivorous plants.
- Use plant-appropriate pruning and replacement Keep the full routine handling method in the care guide.
- Reconsider growing room and removal access Compare spread and mature form before replacing the plant.
- Use the air-plant drain, dry and return method Keep water out of enclosed bases before returning to an open support.
Check aging, seasonal rest and the end of a flowering display
An occasional older lower leaf can yellow and die while the rest of a mature plant remains sound. Remove loose dead material and keep observing. Rapid loss of many leaves, a deteriorating center or soft tissue needs investigation even if the calendar suggests a rest period.
Evidence[7]
A flytrap’s black outer traps need seasonal context
In ordinary seasonal Venus flytrap culture, shorter days and cooler conditions can bring dieback while the living rhizome persists. Check the center and follow its established seasonal routine. Soft decay is not explained away as dormancy. Dedicated continuous indoor culture is a separate strongly lit, regularly fed routine; do not switch simply to force winter growth.
Evidence[15]
A finished flowering accent is a different decision
Persian violet, Exacum affine, is short-lived and difficult to maintain after flowering. Faded flowers alone do not establish root failure. Retain sound growth if its care still fits, or plan replacement for the finished display; do not promise that a rescue treatment will restore indefinite flowering.
Evidence[16]
- Check the flytrap’s complete seasonal conditions Keep ordinary cool rest and the continuous indoor exception distinct.
- Choose Persian-violet aftercare or replacement Use the plant’s actual remaining growth and display role.
Judge the response by new damage and retained living tissue
Record your action and compare the same leaves, crown and root area at the next inspection. Recheck sooner for rapid change; there is no universal rescue deadline.
| What happens next | Continue or change course | What not to assume |
|---|---|---|
| No new damage; retained growth stays firm | Keep suitable care and record the next check. In active growth, watch for sound new leaves. | An old yellow or brown leaf need not turn green to show improvement. |
| Wilt persists after correcting confirmed dryness | Check roots, temperature and other damage before adding more water. | A second dose is not the default response. |
| New damage, softening or pest evidence continues | Inspect again, separate affected material and seek identification or plant-specific help. | Do not wait for a cosmetic change in the glass. |
| The same stress returns after each correction | Change the vessel, root medium, neighbors or plant role to conditions you can maintain. | A repeated rescue routine is not evidence that the arrangement fits. |
Skip rescue measures that add another stress
When removal, a rebuild or expert help is the useful next step
Remove a severely decayed plant or one that cannot be inspected or managed safely in place. If some tissue is viable, care for it separately while deciding on a plant-appropriate recovery route. Rebuild when inaccessible decay, persistent unsuitable roots or incompatible requirements prevent a local correction; one aging leaf does not justify dismantling a sound bed.
For continuing unexplained decline, ask a nursery, local horticultural service or plant diagnostic clinic. Provide the plant name, whole-display and close photos, root and crown observations, symptom timeline, and water, cover, position and treatment history. Ask how to collect a sample before cutting or sending material.
- Remove and replace a plant with less disturbance Support roots and protect the surrounding planting.
- Handle visible decay and recurring fungal growth Follow the complete mold cleanup method and the checks for removal or further help.
- Rebuild around a maintainable root arrangement Use the complete construction route when the layout must change.
Your next step
Correct the underlying conditions
Explore more in care
Sources and review
- Plant and Insect Diagnostic Clinic — sample submission · Iowa State University Extension and Outreach
- Diagnose Indoor Plant Problems · University of Maryland Extension
- Root Rots of Indoor Plants · University of Maryland Extension
- Yellowing Leaves on Indoor Plants · University of Maryland Extension
- Watering Indoor Plants · University of Maryland Extension
- Lighting for Indoor Plants · University of Maryland Extension
- Leaf damage on houseplants · Royal Horticultural Society
- How to help a poorly houseplant · Royal Horticultural Society
- Air plants · Royal Horticultural Society
- Diagnosing Houseplant Problems · Iowa State University Extension and Outreach
- How to Create and Care for a Terrarium · Iowa State University Extension and Outreach
- Plants and Youth: Designing and Building a Terrarium · University of Florida IFAS Extension
- Managing insects on indoor plants · University of Minnesota Extension
- Clean and disinfect gardening tools and containers · University of Minnesota Extension
- Venus Flytrap Dormancy · North Carolina Cooperative Extension, New Hanover County
- Exacum affine · NC State Extension Plant Toolbox