Build / Design and growing room
Terrarium ideas: choose a layout you can grow and maintain
Start with a directly planted humid bed—the conventional rooted terrarium form—then compare when removable pots or soil-free supports serve a different care need.
By Terrarium GuideSources & editorial method
The short answer
Choose the layout by the roots you need to reach: a shared humid bed for plants with overlapping care, a wide removable pot for creeping jewel-orchid stems, a draining succulent pot inside open glass, or a removable soil-free air-plant support. Keep floor space for sideways growth, headroom for upright leaves or flowers, and an opening that allows care and removal.
The shared bed is the conventional directly planted terrarium: roots go into prepared growing medium after the nursery pot is removed. Separate inner pots help when root care must stay independent; the succulent design is an open dry display. The four layouts below compare these spatial and care choices. They are source-based design concepts, not tested builds; use the assembly guide for the complete construction sequence.
Start with the root setup, then choose a layout
A planted terrarium normally has roots placed directly in the prepared bed. The first option shows that form; the removable-pot pictures are alternatives for separate root care, and the air-plant support is soil-free.
- Standard planted form · humid shared bed
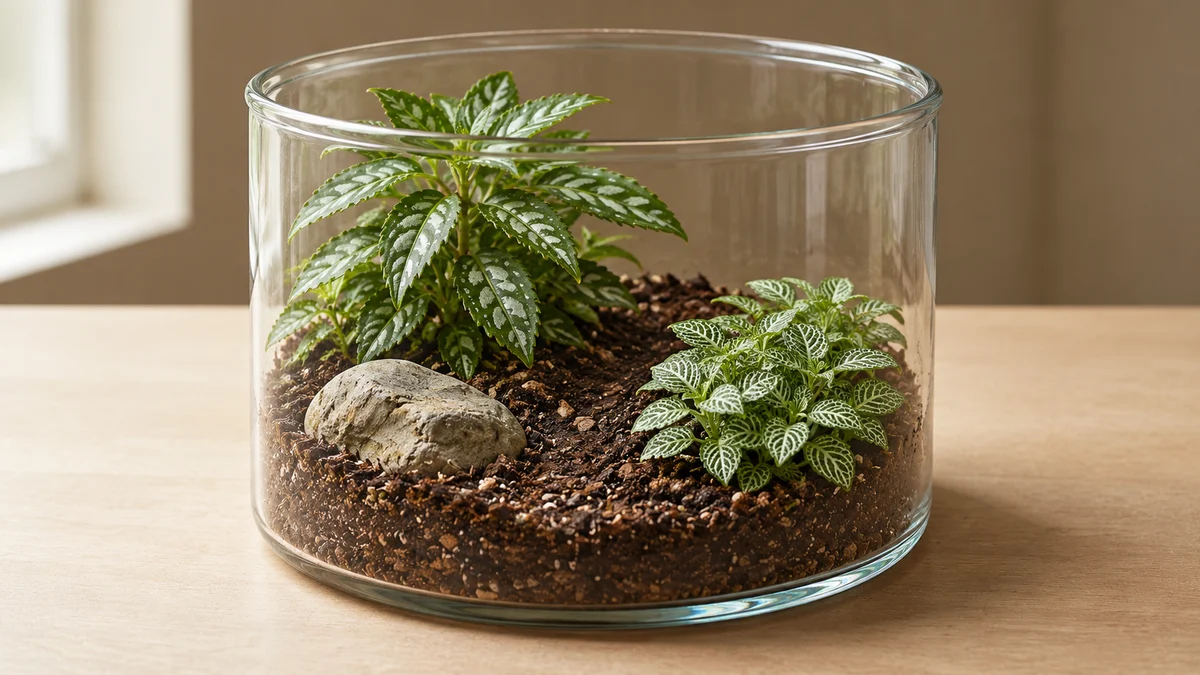
This is a directly planted bed: roots sit in shared growing medium, not nursery pots. The exposed strip leaves access to the plant bases; the pictured gap is a layout idea, not a measured planting distance. - Plant compatible roots directly in the bed
The pictured Fittonia–Pilea arrangement is an existing specific partly open plan, not a universal plant pairing. Read the shared humid planting conditions before choosing both members; follow the direct-planting workflow for a shared bed. The separate single-plant example keeps its roots in a removable draining pot.
- Check
- Can the actual plants share light, root moisture, and room, with enough opening to reach the bed?
- Action
- Dry-fit with nursery pots first, then remove them and place roots in the prepared medium. Keep the planting accessible for inspection and trimming.
- Alternative · creeping terrestrial orchid in a wide pot
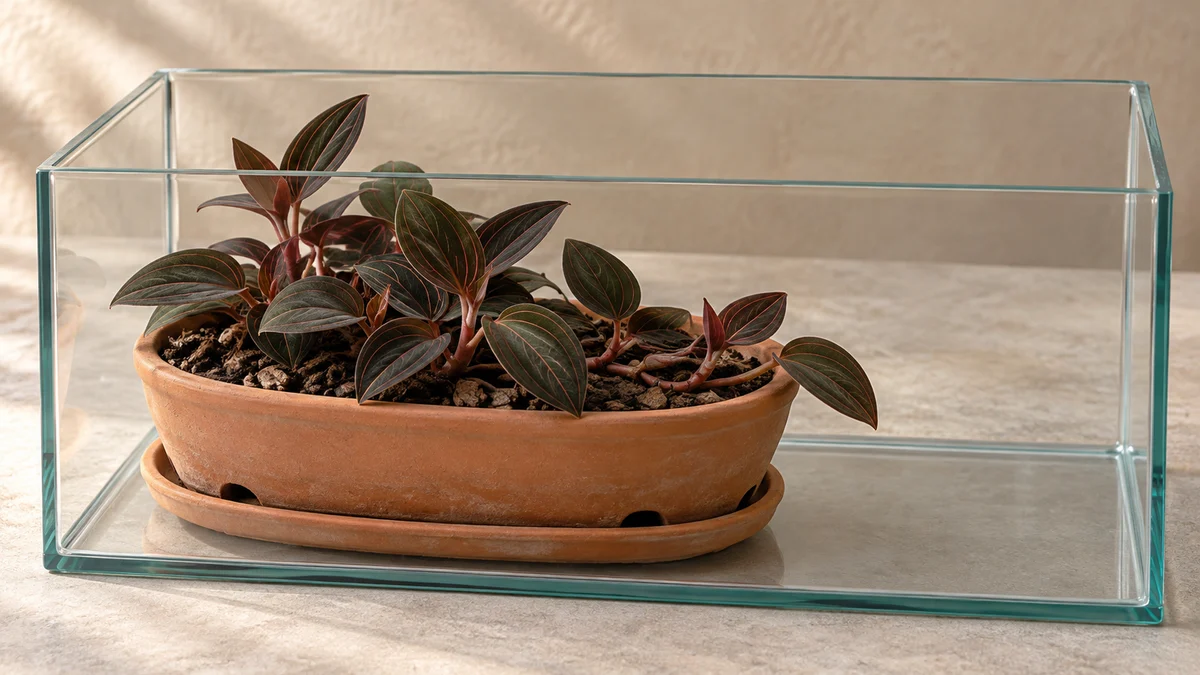
Keep the wide pot rim and surrounding floor visible so the plant can come out for watering. The low stems need sideways space, and future flower spikes need headroom; check the actual specimen rather than measuring this image. - Give Ludisia room across the floor
One Ludisia discolor uses a shallow wide draining pot. The horizontal stems and dark leaves form the focal planting without a second species or a moss carpet.
- Check
- Can the pot lift out without bending stems, and is there lateral growing room plus headroom for future flowers?
- Action
- Use moist, well-drained terrestrial-orchid medium; keep warmth, suitable indirect light and air circulation. Water outside the case and return the pot to an empty saucer.
- Stop or reassess
- If roots stay wet, stems press against glass or the pot cannot come out, change the root setup or display size.
- Alternative · open succulent dish display
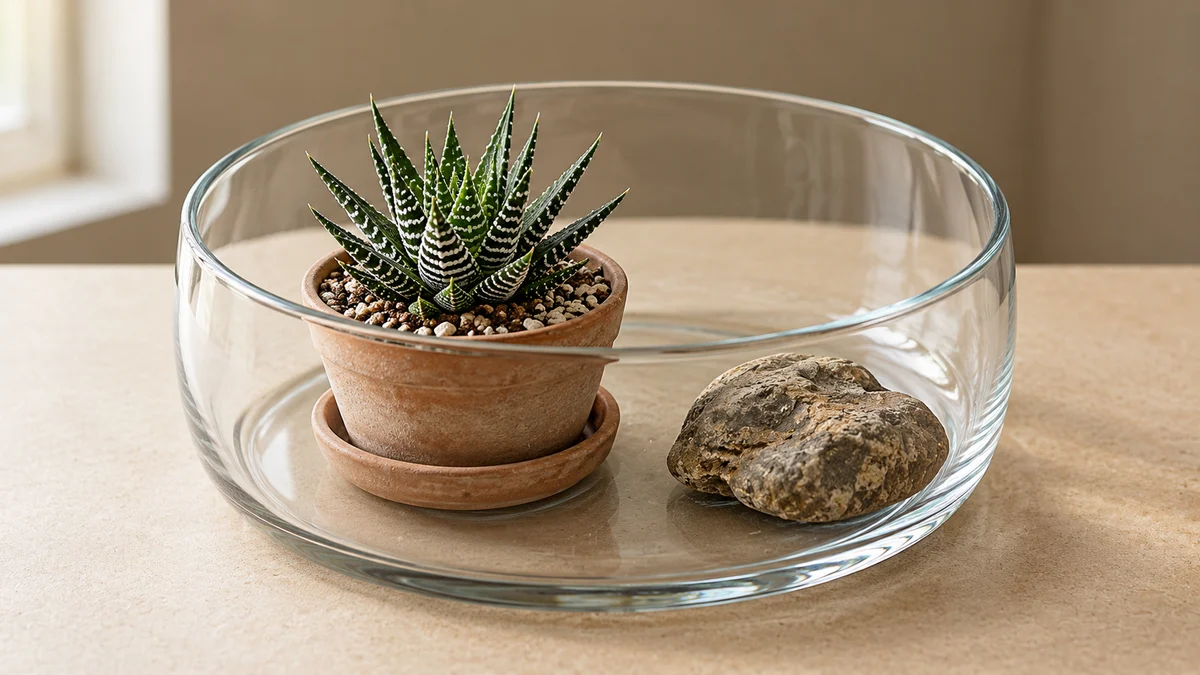
This open double-pot display is an alternative, not the standard directly planted terrarium. The stone stays beside the pot; lift it out to water and drain because the glass itself has no outlet. - Use a draining pot inside open glass
One identified Haworthiopsis attenuata stays in a draining pot inside an open bowl; a separate low stone supplies contrast without adding another watering routine.
- Check
- Can you supply the plant’s light, an open dry environment, a draining pot, and space for offsets?
- Action
- Let the root medium dry between waterings. Remove the pot to water and drain, empty the saucer, and keep its removal path clear.
- Separate display · soil-free air-plant support
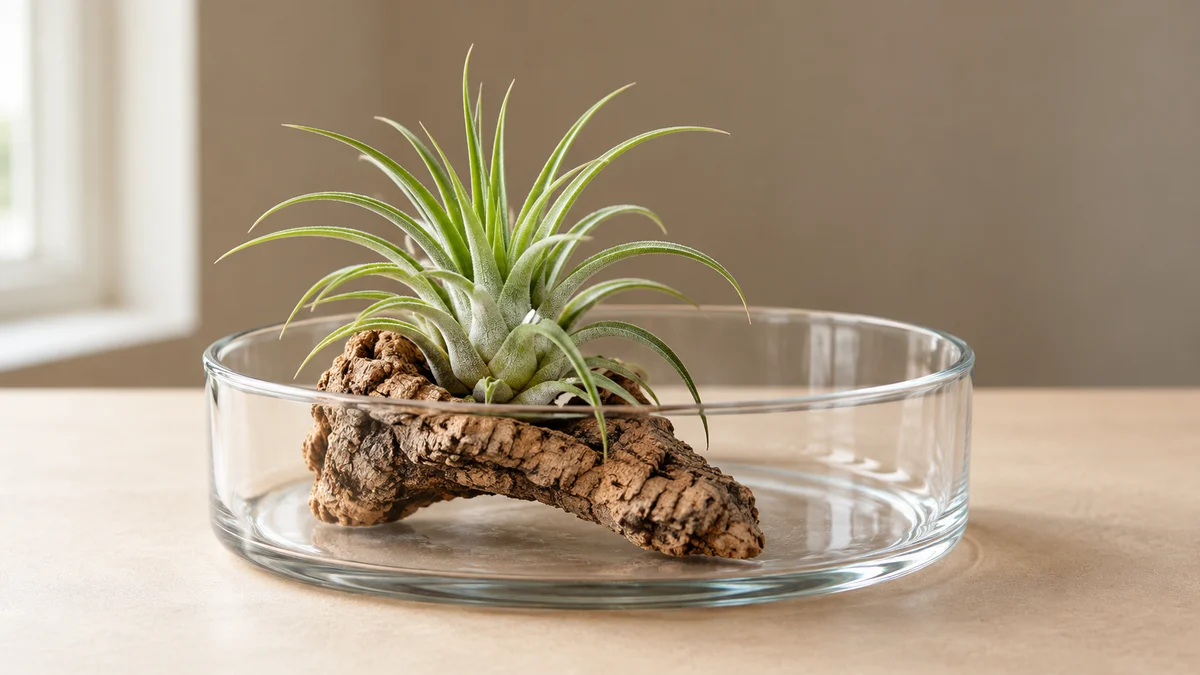
Keep the plant base above the dish rim and out of wet filler. The whole support must lift out for watering and drying; the picture cannot establish airflow. - Keep the plant above the rim
One identified Tillandsia ionantha rests on a removable support in a low open dish. Its leaf silhouette makes the scene without a planted floor.
- Check
- Can the base receive air, and can the plant and support come out without bending the leaves?
- Action
- Water thoroughly by the plant’s care guidance outside glass, release retained water, and allow proper drying before returning it.
- Follow direct planting from materials to first check Prepare the shared bed, set the rootballs, add water cautiously, and inspect the new planting.
- Use the removable-pot single-plant alternative Keep one compact nerve plant in a draining pot that comes out for watering.
Scope and important limits
A useful fit when
- Choosing and assembling a maintainable small plant display.
- Adapting a composition to actual specimens, light, and reachable growing space.
Use another path when
- A universal plant mixture, permanent miniature size, or a sealed self-maintenance promise.
- Aquatic or animal habitats, product contents, or a measured long-term growing trial.
Plant requirements come from the cited horticultural guidance. Pot positions, empty space, and the assemblies are editorial applications of those requirements; the illustrations show spatial relationships.
Test the layout before you fill the glass
Choose the viewing side and the light
Check the actual position at different times of day, including direct sun and heat. For a one-sided view, offset the focus and keep the front low; for a view from all sides, keep an inspection route around it. These compositions do not establish a window distance or a light level.
Evidence[2]
Dry-fit the whole root ball or support in the empty vessel
Keep nursery pots on for this temporary space test. Compare mature growth with the lid or rim and leave a route to the stems. For a directly planted bed, remove the pot after the dry fit and place roots in the prepared medium; retain a pot only for the removable-pot alternative. A photo cannot set the finished vessel size.
Try the future care action now
Lift the pot or support straight out, reach the back with your intended tool, and check that the saucer can be emptied. If leaves catch or hardscape blocks your grip, remove an ornament, choose wider glass, or use the plant as a separate potted display.
A dark-leaf island: Ludisia in a wide removable pot
- Plant and maintain Ludisia discolor Check terrestrial medium, creeping stems, flowering growth and root problems.
- Need a mounted or cooler-growing orchid instead? Compare other root methods and temperature needs before substituting a plant.
Open dish-display alternative: succulent in a draining pot
Evidence[5]
- Compare other succulent shapes and light needs Check the named alternatives before substituting an Echeveria, Aloe, jade, or trailing plant.
- Considering a shared Aloe–jade garden? Use its full conditions and a container with a drainage outlet; it is a different root-zone design.
- Compare open and closed growing conditions Keep a dry open dish separate from a humid planted terrarium.
Air-plant cradle: let the leaves make the landscape
- Follow the watering and drying care route Keep species-specific methods, retained-water checks, and the glass-return condition together.
- Prefer a hanging curtain? Spanish moss needs a different open hanging support and access to the full bunch.
Prefer a different landscape? Change the plan with the plant
| The look you want | A useful direction to investigate | What changes in the layout |
|---|---|---|
| A low, close-up leaf garden | A verified dwarf Fittonia form; use the existing single-plant build. | Keep lateral growth and trimming reachable. Do not add a fast groundcover solely to cover bare space. |
| A moss-covered surface | Identify living moss and its surface requirements first. | A living carpet needs suitable moisture, light, and an accessible edge. Preserved decorative moss is a material, not a growing substitute. |
| Feathery woodland height | Compare true fern identities and cultivated forms. | Reserve the whole frond span and growing point, not just today’s pot. Asparagus “ferns” are different plants with different growth. |
| A tiny mounted flowering accent | Compare the named Schoenorchis fragrans route in the orchid guide. | Use a removable cork support and the species-specific warmth, light, root-drying and access routine; it does not inherit Ludisia’s terrestrial pot. |
| A miniature tree | Use an identified Ficus microcarpa bonsai form on an open, accessible pot-based layout. | Leave crown and pruning room, and plan repotting. A young plant or “Ginseng” label does not establish a permanently small tree. |
| An open bog with moving traps | Use the dedicated Venus flytrap build and identified plant guidance. | Plan strong light, low-mineral water, suitable nutrient-poor medium, and the seasonal or dedicated indoor routine before adding scenery. |
Evidence[2][13][14][12][10][11][15][16]
- Build the existing compact Fittonia example Use its complete materials and assembly; it is not duplicated here.
- Choose living moss and a planting surface Check identity, moisture context, and how to maintain the patch.
- Compare fern forms and growing room Distinguish true ferns from spikemoss and asparagus names.
- Compare terrestrial and epiphytic orchids Choose root care and flowering space before copying a leafy scene.
- Plan an open Ficus bonsai display Use the named form’s pot, pruning, root, and access checks.
- Assemble a dedicated flytrap setup Keep its water quality, root medium, light, and seasonal move together.
Keep the design usable as it changes
- You want to fill the remaining space
- Check the growing footprint first.
- Check
- Is this floor really spare, or is it the only route to water, inspect, or lift out the plant?
- Action
- Keep it empty when it serves care. For a second plant, compare roots, light, air, growth, and the shared layout before planting.
- Stop or reassess
- Matching color, matching pot size, and matching moisture labels do not establish a compatible pair.
Evidence[2]
- Leaves or offsets reach the rim
- Change the layout before removal becomes damaging.
- Check
- Test the whole plant and pot or support against the opening, including its widest growth.
- Action
- Use appropriate reachable pruning or division only where the plant’s guidance supports it. Otherwise move to wider glass or a separate pot.
- Stop or reassess
- Do not bury growth, crush leaves, or cut healthy roots to preserve the original picture.
- Wetness, leaf condition, or drying changes
- Inspect the plant and its care route.
- Check
- Look at root moisture, retained runoff, wet leaf bases, light, and heat in the actual position.
- Action
- Empty excess water, restore the appropriate drying or moist-root routine, and revise the enclosure if its conditions cannot be maintained.
- Stop or reassess
- A good-looking scene or condensation pattern cannot establish health or permanent balance.
- Carry the chosen layout into routine care Use the observation and cleanup routine after choosing a workable layout.
Your next step
Continue your terrarium plan
More detail when you need it
- Choose a vessel with usable accessCompare openings, growing space, lids, and the route for water and maintenance.
- Decide when to observe or interveneDistinguish visible cues from a diagnosis and check the medium before acting.
- Compare existing mixed planting plansKeep each scheme’s full conditions at its environment page rather than copying a decorative mixture.
Before you start
- Choose and prepare the root mediumCompare ingredient functions, scoped recipes, and the root arrangement before filling.
- Prepare a supply list for your planting methodCheck essential tools, conditional layers, springtails, and hardscape before assembly.
- Choose the enclosure by its conditionsCompare moisture retention, light, airflow, root care, and ongoing work.
Explore more in build
Sources and review
- Pilea cadierei — foliage, indoor culture, and problems · NC State Extension
- How to Create and Care for a Terrarium · Iowa State University Extension and Outreach
- Fittonia albivenis — companion evidence · NC State Extension
- Indoor Plant Care — existing companion ventilation context · Purdue University Extension
- Haworthiopsis attenuata — NC State Plant Toolbox · NC State Extension
- Tillandsias as Houseplants · Penn State Extension
- Air Plants — RHS Care Guide · Royal Horticultural Society
- Tillandsia ionantha — NC State Plant Toolbox · NC State Extension
- Ludisia discolor — terrestrial roots and growing room · NC State Extension
- Ludisia discolor — source-scoped growth profile · NParks Flora & Fauna Web
- Mounting orchids — supports and root moisture pads · American Orchid Society
- Tender ferns — houseplants · Royal Horticultural Society
- Lawn Moss: Friend or Foe? — transplanting and establishment · Virginia Cooperative Extension
- Preserved reindeer moss — decorative product and care limits · Koch & Co
- Ficus microcarpa 'Ginseng' — NC State Plant Toolbox · NC State Extension
- How to care for a Venus fly trap · Royal Horticultural Society
- Growing Succulents Indoors · Iowa State University Extension and Outreach
- Building A Dish Garden · University of Vermont Extension