Materials / Light and placement
Terrarium light: choose a position and set up a grow light
Decide whether daylight is enough, compare practical fixtures, and adjust the light reaching the leaves.
By Terrarium GuideSources & editorial method
The short answer
For a humid foliage terrarium, choose bright, indirect daylight and keep the glass out of heating direct sun. If that position is too dim or unavailable, use an adjustable white or balanced-spectrum growing light that covers the planting. Ordinary room lighting is not evidence that the leaves receive enough light.
Set the fixture by its instructions and light at leaf height, then use a timer. For ordinary foliage houseplants under lights, 12–14 total light hours per day is a useful general starting point, followed by darkness. Count daylight and lamp hours together; follow the identified plant’s seasonal and flowering requirements when they differ.
Do you need a grow light?
| Your position | Useful choice | Check before committing |
|---|---|---|
| Bright daylight without heating direct sun | Use daylight first if it meets the identified plants’ needs. | Watch the actual position across the day and season; a bright room can still have a shaded planting. |
| Useful daylight, but a dim winter or shaded part of the planting | Add a timed supplemental light over the area that needs it. | Check the darkest leaves and count the combined day, rather than adding a full lamp day after sunset. |
| A shelf away from useful window light | Provide a dedicated growing light and a regular dark period. | Choose a fixture with coverage and output information for the full planted footprint. |
| A glass enclosure in a moving patch of strong sun, or beside a heat source | Change or shade the position before adding equipment. | A brighter position can also overheat the enclosure; a timer does not control sunlight or trapped heat. |
- Choose the environment as well as the light Opening the top changes care, but does not settle the light or roots.
Scope and important limits
A useful fit when
- Positioning a plant terrarium indoors and deciding whether to add a growing light.
- Choosing and adjusting an external fixture for an accessible display.
Use another path when
- A universal lamp wattage, PPFD target, or lighting schedule for every plant.
- Animal UVB/heat requirements, aquarium lighting, electrical modifications, or brand rankings.
The setup method applies published indoor-growing guidance to terrarium access and glass. It is not a Terrarium Guide fixture test or growing trial.
Check daylight at the intended growing position
Check before filling heavy glass. Repeat when the season, nearby shade, or room arrangement changes.
Follow the light through the day
Look at the exact shelf in the morning, middle of the day, and afternoon. Note direct sun reaching it, curtains, buildings, and nearby trees. Window direction alone cannot account for those obstructions.
Evidence[6]
Inspect at leaf height inside the arrangement
Consider the cover, tinted walls, tall plants, and hardscape between source and leaves. Compare the front, back, and lowest planted area, rather than judging from the bright glass rim.
- Check the cover and clear walls Transparency and access are container choices; the shelf still needs suitable light.
Match the position to the identified plants
Bright, indirect light is the starting route for a humid foliage planting. Do not move that sealed garden into strong sun to imitate a succulent display. If your plant needs a different exposure, change the display or provide its own controlled light.
- Compare indoor light needs and tolerance Use the evidence filters and actual plant guides; a shared light label does not establish compatibility.
Choose a fixture for coverage and control
For a new small indoor setup, compare adjustable white or balanced-spectrum LEDs first. Keep a usable fluorescent fixture in consideration if it fits the space and its output is suitable.
| Option | Useful role | What to verify |
|---|---|---|
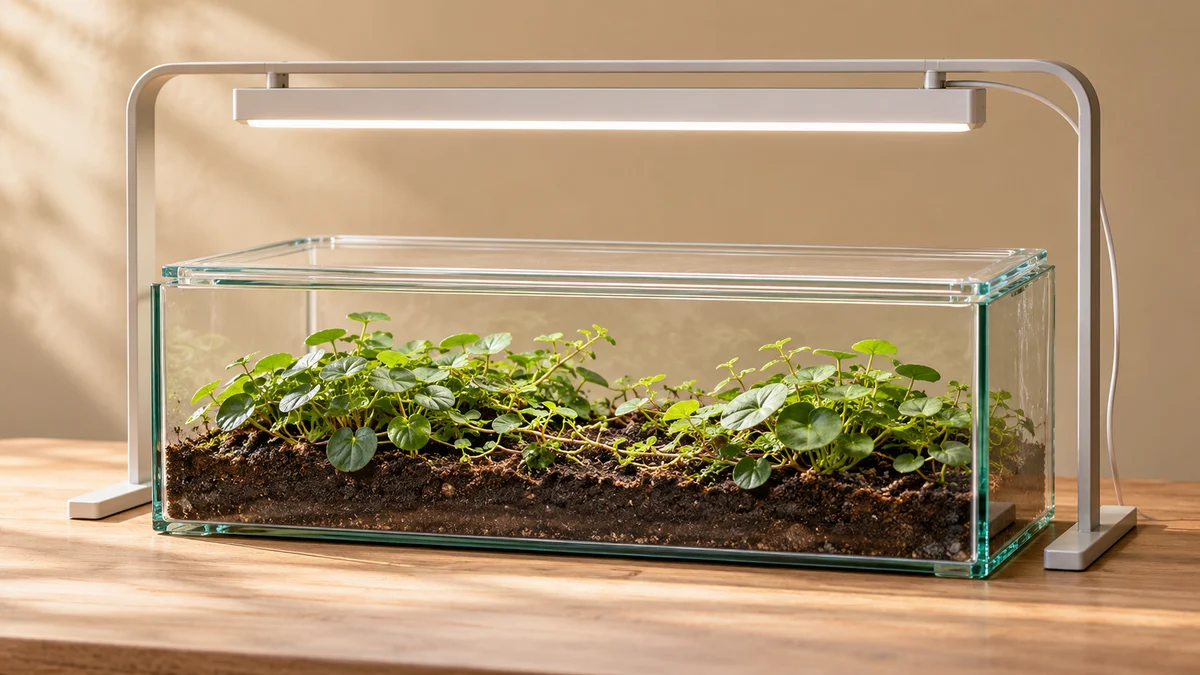
| LED bar or panel on an independent stand or shelf | Covers a wider planting; efficient, with less heat than incandescent lighting. | Output at the intended distance, coverage at the edges, height adjustment, and room to lift the lid. LEDs still need heat clearance. |
| A growing bulb in a compatible adjustable lamp | A compact option for one small display. | The bulb and lamp are compatible; the beam reaches all planted areas, not just one bright central spot. |
| Fluorescent growing fixture | A workable option, especially when already available. | Lamp spectrum and condition, clearance, and replacement needs. It generally uses more electricity than an equivalent LED setup. |
| Decorative fairy lights or a distant room lamp | Viewing decoration only unless adequate growing output is actually established. | Visible sparkle or a bright-looking room does not measure useful light reaching leaves. |
| Incandescent or large hot discharge fixture | An unsuitable starting choice for a small glass foliage garden. | High heat and, for discharge systems, large-scale mounting requirements outweigh their usefulness here. |
- Return to the full supply list Buy a light when the growing position needs it.
Read light claims before buying
A “full spectrum” label or a Kelvin color rating does not tell you how much light reaches the plants. Look for measured output and a coverage diagram at the intended mounting distance. White or balanced light also makes ordinary leaf inspection easier than a strongly colored display.
Check the permitted installation position, mounting method, timer compatibility, and clearance in the actual product instructions. For this simple setup, keep the fixture outside the growing enclosure and electrical parts away from watering and condensation. A horticultural label alone does not establish suitability inside a wet case.
Watts, lumens, PPF, and PPFD describe different things
Watts describe electricity use. Lumens and lux describe light weighted for human vision. PPF describes the fixture’s plant-usable photon output per second; PPFD describes how much reaches a surface such as the leaves, in micromoles per square meter per second (µmol/m²/s).
For coverage, compare PPFD at the center and edges of the planned growing area at a stated distance. Total output alone cannot show whether the lower front leaves receive enough. A light meter or suitable app can help compare positions, but converting lux to PPFD depends on the source spectrum; do not use one conversion for every lamp.
Keep the fixture separate from the wet growing space
The stand supports the light above the glass instead of resting it on the lid. Keep a practical route for moving the light and removing the cover.
Evidence[4]
Set up distance, coverage, and access together
No single distance works for every bulb, beam, or terrarium. Start with the chosen fixture’s instructions, then check the plants and the complete growing area.
Mount the light without trapping the cover
Use the intended stand or mounting system and leave the lid, watering route, and inspection path accessible. Check that adjusting or removing the light does not pull on the glass. Keep its required ventilation and heat clearance.
Evidence[4]
- Test the care route Try cover removal and future plant access in the real position.
Set the distance to the foliage
Measure from the emitting surface to the upper leaves, not to the tabletop or bottom of the jar. Start at the manufacturer’s growing distance for the intended plant group. If the product has no useful output or installation guidance, choose one with documented performance instead of guessing from watts.
Check more than the brightest spot
Use the fixture’s coverage data or measurements at representative leaf positions, including the edges and lower growth. Check with the normal cover in place when the sensor can be positioned safely. If not, treat an outside reading as an approximation; do not force equipment through a narrow neck.
Run the normal cycle and inspect heat and growth
Check conditions at canopy height during the lighting period, including when window sun may also reach the case. Record the starting distance, timer, and plant appearance. Review new growth over the following weeks and adjust the setup if needed; respond immediately to overheating.
- Keep a useful observation record Track roots, growth, access, and inputs together.
Use a timer without extending the day endlessly
For ordinary foliage houseplants under lights, Minnesota gives 12–14 hours of total light per day as general guidance. A practical starting example is a consistent 8 a.m.–8 p.m. light window, with darkness afterward. Where daylight contributes, run the supplement within that daytime window rather than adding twelve extra hours at night.
Intensity still matters. Running a very weak lamp longer cannot be assumed to reproduce a suitable brighter setup. Plants need a dark period, and flowering or seasonal responses can require a different schedule. Do not apply the foliage example to every orchid, succulent, or carnivorous plant.
If you measure a steady PPFD, daily light integral (DLI) describes the day’s accumulated light: PPFD × hours × 0.0036 gives mol/m²/day. For example, a constant 50 µmol/m²/s for 12 hours gives 2.16 mol/m²/day. This is arithmetic, not a recommended target. Changing daylight must be assessed across the day; one noon reading does not represent it.
- Keep carnivore light and seasons together A foliage timer does not replace a named plant’s seasonal routine.
- Check orchid identity before changing the schedule The group includes different light, temperature, and growth requirements.
Adjust from a pattern, not a single leaf
These observations prompt checks. Yellowing, browning, or slow growth can have several causes; check the roots and temperature as well as the light.
- New growth stretches or leans toward the source
- Check light reaching the stretched growth.
- Check
- Compare its position with compact growth, source distance, shadows, and the daily schedule.
- Action
- If the measured or documented coverage is inadequate, improve position or output gradually within the plant’s needs and fixture limits. Review subsequent growth.
- Stop or reassess
- Do not move a closed foliage jar into hot direct sun or compensate with continuous lighting.
- Exposed upper leaves become pale or scorched after a light change
- Check excessive exposure and heat first.
- Check
- Look for a pattern nearest the lamp or sunny side and review the recent change. Inspect moisture and pests too.
- Action
- Reduce the exposure by repositioning or dimming within the fixture instructions; remove heating direct sun. Existing damaged tissue is not an immediate test of recovery.
- Stop or reassess
- If the enclosure is overheating, correct that position promptly rather than waiting for new growth.
- The top grows well but the lower planting is shaded
- Check canopy obstruction and coverage.
- Check
- Compare upper and lower leaf positions, tall neighbors, opaque covers, and edge coverage.
- Action
- Restore suitable growing space or rearrange the planting before increasing the whole fixture. A stronger center may overexpose the top while leaving the shadow.
- A leaf yellows, or growth remains slow despite adequate light
- Broaden the check before buying another lamp.
- Check
- Review the actual roots, watering, temperature, plant identity, and seasonal behavior.
- Action
- Hold a reasonable light routine while checking those other conditions. Condensation is not a light meter, and fertilizer cannot substitute for a suitable growing position.
- Broaden the check when light does not explain decline Compare roots, tissue, pests and recent changes before changing another lamp setting.
Keep different displays on their own care terms
This page chooses and sets up the light source. Plant selection determines the exposure it must provide. An open succulent pot, a removable air-plant support, and a seasonal bog plant do not inherit a humid foliage jar’s light and timer settings.
Keep the named plant’s light, root conditions, temperature, and seasonal instructions together. If two plants cannot share those conditions, independent watering alone does not make the combination work.
Evidence[7]
- Choose an open succulent routine Keep strong enough light with an actual drying and drainage route.
- Check the air-plant support and care route Light does not replace open positioning, watering, and drying.
- Compare carnivorous requirements Choose the actual plant before setting light, water, and season.
Your next step
Plan the rest of the build
Explore more in materials
Sources and review
- Terrariums and bottle gardens — position, light, and heat · Royal Horticultural Society
- Lighting for indoor plants and starting seeds — fixture types, units, spectrum, and total light hours · University of Minnesota Extension
- Important Considerations for Providing Supplemental Light to Indoor Plants — intensity, duration, and units · Iowa State University Extension and Outreach
- How to Set Up Supplemental Lights for Indoor Plants — adjustment, canopy coverage, and timers · Iowa State University Extension and Outreach
- How to Determine How Much Supplemental Light to Provide for Indoor Plants — measurement, DLI, and growth adjustments · Iowa State University Extension and Outreach
- Lighting for Indoor Plants — changing daylight, obstructions, and growth response · University of Maryland Extension
- How to grow houseplants — plant-specific position, temperature, and light · Royal Horticultural Society
- Artificial lighting for indoor plants — spectrum, supplemental light, and exposure problems · Royal Horticultural Society
- Leaf damage on houseplants — multiple causes and light damage · Royal Horticultural Society