Materials / Choose the vessel
Terrarium containers: choose glass you can plant and maintain
Compare the opening, growing space, lid, and water route before buying a jar or copying its shape.
By Terrarium GuideSources & editorial method
The short answer
For a humid planting you will maintain by hand, start with a clear, untinted, wide-mouth container and a removable lid. Test the actual rootball, tools, and future removal route through the opening. A large bottle body can still have a difficult neck.
Choose an open arrangement for plants that need drying or exposed supports. Glass without drainage holes retains added water: use a separately removable draining pot when that is the chosen growing method. Match the container to the plant and care routine before choosing its decorative shape.
Choose a shape by the work it allows
| Container | Useful when | Check before choosing |
|---|---|---|
| Wide-mouth jar with removable lid | You want an accessible humid bed with a cover you can lift. | Rootball, hand/tool, and outgrown plant must pass the narrowest opening. |
| Shouldered or narrow-neck bottle | You deliberately want a bottle garden and can work with long tools. | The neck constrains planting, cleaning, pruning, and later removal even if the body is large. |
| Open bowl or broad dish | You need regular access to an open planting, removable pot, or support. | In-curving rims can still trap a wide pot or foliage; open glass has no automatic drain. |
| Rectangular case or aquarium | You need a broad footprint or several accessible root zones. | Check the actual access panel/cover, far corners, and how water can be removed. |
| Cloche or bell jar over a pot | You want a lift-off cover around an independently managed root pot. | The cover must clear the full canopy; it creates a humid enclosure and must suit the plant. |
| Clear uncolored plastic container | You want a transparent alternative to glass. | Check clarity, usable opening, cover access, and plant space in the actual container. |
- Choose the environment before the shape Compare the consequences of closure, open access, and different roots.
Scope and important limits
A useful fit when
- Choosing a new vessel or checking a clean container you already own.
- Comparing a direct-planted humid bed with pot-based or support-based alternatives.
Use another path when
- Aquarium or animal-enclosure specifications, glass construction, or a brand shopping list.
Recommendations apply published container guidance to practical care access. Pictures are examples, not measured product specifications or site growing trials.
Compare the mouth with the body
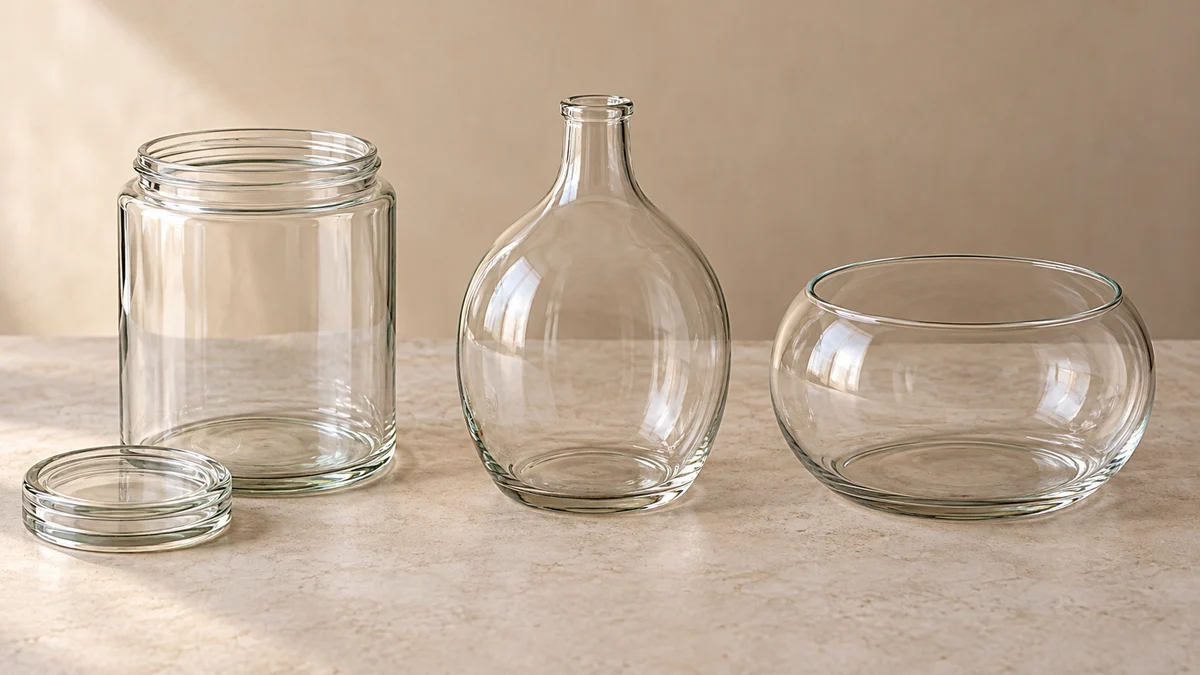
The central bottle has room below its shoulders but a small route into it. The bowl also curves inward at the rim. Judge the narrowest point the plant must pass.
Try the care route before filling the container
Use the empty vessel and the objects you will actually handle. These practical checks apply the published guidance on openings and growing room.
Pass the complete rootball or support through the opening
Keep a nursery pot on for this temporary test. For a removable-pot display, include that pot, saucer, and foliage. For a mount, include the entire support. Choose wider access if the route requires crushing growth.
- Check growth and access together Account for spread as well as current sales-pot size.
Reach the farthest working point
Try the spoon, tweezers, watering spout, or other intended tool with the vessel empty. Check that you can reach behind the planting and remove debris; a tool that reaches the bottom may still lack room to turn.
- Choose controllable planting tools Use tools that fit the actual opening.
Try the future removal
Lift the whole pot or support out without catching. For direct planting, preserve a reachable route to loosen roots and remove an outgrown plant. If this is already awkward in an empty vessel, choose a different shape or fewer plants.
- Dry-fit the complete layout Include hardscape, viewing sides, and care access.
Measure usable space, not just liters or gallons
| Measure or check | Allow for | Decision it helps you make |
|---|---|---|
| Narrowest clear opening | The widest object entering or leaving, plus a usable grip. | Whether roots, foliage, pot, or mount can pass safely. |
| Planting footprint | Actual rootballs, future spread, and a reachable inspection area. | How many plants fit without filling every gap. |
| Height above the planned growing surface | Canopy, new fronds or flower stems, and the lid. | Whether tall glass still leaves useful space after the root layer. |
| Depth for the root arrangement | Rootballs, growing medium, any chosen base, or pot and saucer. | Whether decorative layers consume space needed for roots. |
| Space outside and above the vessel | Lifting the cover, extracting the plant, and reaching it on the shelf. | Whether the display remains usable in its intended position. |
- Plan growing depth around the roots Keep root medium and lower collection space separate.
Choose a cover and clear walls for the task
Clear, uncolored glass or plastic lets you see the planting and admits light. Reject a decorative finish that prevents useful inspection or greatly obscures the plants. Transparency alone does not establish that the intended shelf has enough light.
For a closed humid garden, use a cover that fits and can be lifted for inspection or moisture adjustment. RHS favors a glass lid and notes that opaque covers reduce light and metal screw-tops can rust. A stopper or lid is a management choice, not a promise that the garden can stay untouched.
A wide opening changes access and water loss; it does not by itself measure air movement among the leaves. For air plants, keep the base exposed and the support removable for the required watering and drying routine. Do not choose a deep globe simply because it has a hole at the top.
- Check the actual air-plant position Choose an open support that can come out for care.
- Separate humidity, roots, and circulation A cover cannot settle all three conditions.
Separate the outer glass from the root container
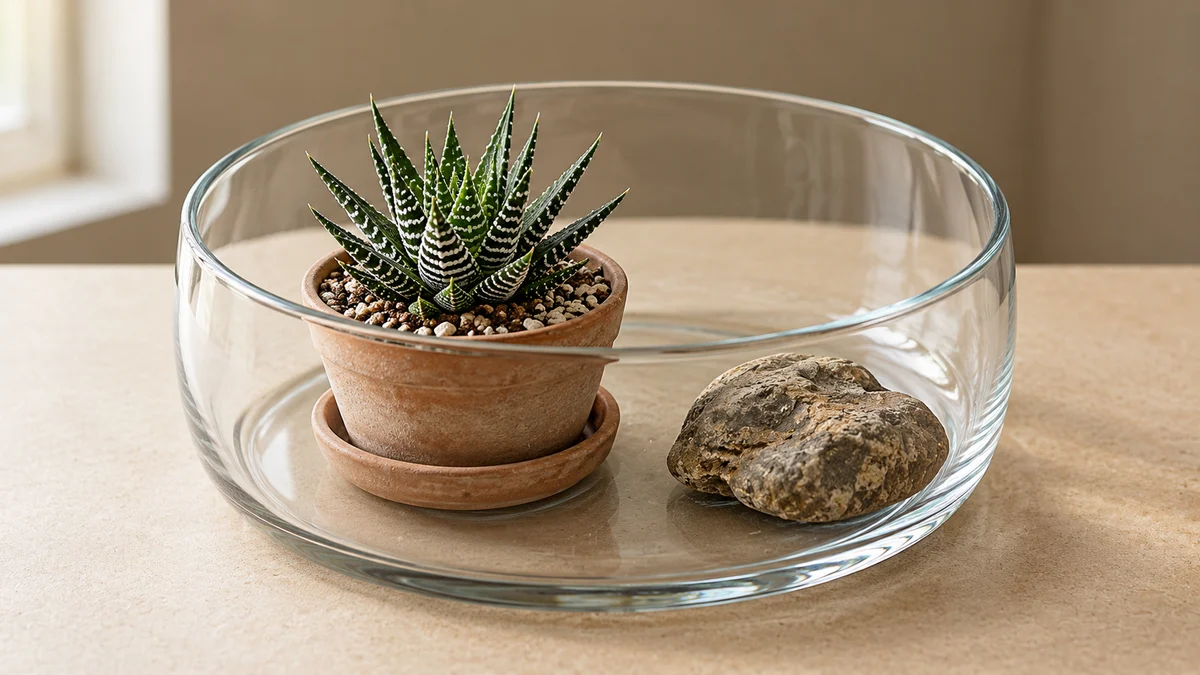
In this open pot-based alternative, root drainage belongs to the inner pot. The surrounding glass is a display vessel; keep its base accessible to inspect and empty.
Evidence[5]
- See the complete open pot-based design Keep its growing space and drying routine together.
Find where excess water can go
Look for an actual outlet in the root container. An open top and a layer of stones do not let water leave a solid glass base. A conventional direct-planted humid terrarium therefore needs controlled watering and a way to inspect and remove unwanted collected water.
For a double-pot display, water the removable draining pot outside the glass, let excess water leave, and empty its saucer or outer container before return. Do not fill around it so thoroughly that the rim, outlet, or grip disappears.
A draining inner pot does not change the light, temperature, or humidity shared above it. Keep a drying succulent display open; a specialist tray-watered plant has a different routine and needs its own instructions.
- Decide which lower layers serve the water route Distinguish a humid collection base from an independently draining pot.
- Build the draining succulent arrangement Follow its separate watering and return sequence.
- Need a dedicated flytrap pot and tray? Keep its specialist water and medium requirements separate.
Check a reused jar or a listing before committing
- Inspect the vessel and its baseAs a handling precaution, leave out chipped, cracked, unstable, or unidentified-residue containers. Check that your chosen surface can support the complete filled display; use verified product information when a load rating matters.
Evidence[1]
- Finish the supply list for the chosen vessel Add suitable medium and tools without crowding the root space.
When the right choice is a different container
- The plant fits the body but cannot pass the neck
- Choose a wider opening.
- Check
- Test the current canopy and roots, including the pot or mount you intend to remove.
- Action
- Change the vessel or select a genuinely manageable plant. Do not force the existing plant through the neck.
- The lid meets the leaves or blocks a growing point
- Reserve more growing height or use another arrangement.
- Check
- Measure from the planned medium surface with the lid fitted.
- Action
- Choose taller usable space, a smaller supported plant, or an appropriately open display. Do not bury the crown to gain headroom.
- Care requires dismantling the hardscape each time
- Restore a clear care route.
- Check
- Try watering, inspecting, and removing the plant with every part in place.
- Action
- Remove an optional feature, widen access, or keep the plant in an accessible separate pot. A shape that prevents essential care does not serve this planting.
Your next step
Plan the rest of the build
More detail when you need it
Explore more in materials
Sources and review
- Creating a Terrarium — transparent containers, access, and growing room · Minnesota Department of Natural Resources
- Plants and Youth: Designing and Building a Terrarium — openings, cleaning, and water · University of Florida IFAS Extension
- Terrariums and bottle gardens — container shape and covers · Royal Horticultural Society
- How to Create and Care for a Terrarium — cases, cloches, and plant removal · Iowa State University Extension and Outreach
- How to Care for Houseplants — double pots and runoff · Iowa State University Extension and Outreach
- How to Design a Closed-System Terrarium — clear glass and plastic · Mississippi State University Extension Service
- Terrariums (HO-13) — container selection, planning, and access tools · Purdue University Cooperative Extension Service
- Tiny gardens, big impact: how to make (and care for) a terrarium — reuse and cleaning · Oregon State University Extension Service
- Air plants — ventilation, support, and drying · Royal Horticultural Society
- Aloe vera — drainage and a drying root routine · NC State Extension