Build / Assemble and observe
How to make a terrarium: prepare, plant, and check your build
Build an accessible humid garden, or follow the separate setup for succulents, air plants, or a Venus flytrap.
By Terrarium GuideSources & editorial method
The short answer
Choose the plants’ environment first, then a clear container you can reach into and a root zone you can maintain. For a humid terrarium, clean the vessel, prepare suitable growing medium, arrange plants with spare room, plant at their existing soil level, add water cautiously, and observe the roots and foliage before settling on a lid position.
Use the separate branches below for drying succulents, supported air plants, and a Venus flytrap. They need different drainage, watering, light, or seasonal arrangements. A gravel layer inside solid glass does not provide an outlet for excess water.
Start with the build that matches your plants
- Directly planted humid foliage · shared bed
- Follow the humid planting sequence
Remove nursery pots and plant in the prepared bed. Start with one compact plant or a checked compatible group. Use indirect light and a removable lid for the closed version.
- Humid foliage · removable inner pot
- Keep one plant in a pot you can lift out
Choose this alternative when you want to water and drain the roots outside glass. It uses a pot and saucer rather than a shared bed.
- Succulents that need roots to dry
- Build an open display with a real drainage route
Use a draining pot or container and a plant-specific wet–dry routine. Do not copy the moist foliage bed.
Evidence[6]
- An epiphytic air plant
- Build an open, removable support
Keep the plant out of potting soil and wet filler. Make watering, draining, and drying possible outside glass.
- An identified Venus flytrap
- Build a separate bright, low-mineral-water setup
Use a dedicated pot, appropriate carnivorous medium, and a seasonal or dedicated indoor routine. Other carnivorous plants need their own plan.
Scope and important limits
A useful fit when
- Assembling a reachable plant display and checking it after planting.
- Following one humid, succulent, supported-air-plant, or named flytrap setup.
Use another path when
- A universal substrate or watering recipe for every plant.
- Permanent sealing, animal housing, or an unidentified carnivorous assortment.
The instructions and simple example apply horticultural sources to practical displays. They are not Terrarium Guide growing trials or evidence that every pictured plant can share a long-term planting.
Gather materials for your chosen branch
- Clean small stones, suitable wood, or identified living mossOptionalUse only what leaves plants and tools accessible. Moss is a living plant with its own surface and moisture needs, rather than a required finishing layer. Leave it out when its identity or care is unclear.
Evidence[2]
Set up the root zone before adding plants
For a traditional layered humid bed, place washed coarse material at the bottom, then a water-permeable separator, then enough appropriate growing medium to surround the roots at their existing planting level. The separator keeps fine medium from settling into the lower layer. Keep roots and crowns out of any collected water.
There is no useful universal layer depth: size the growing zone around the actual rootballs, then check remaining headroom. Do not fill most of the vessel with decorative gravel and leave only a shallow skin of soil for rooted plants.
The coarse layer is collection space inside the container, not external drainage. If water accumulates, stop adding it and remove the excess; if you cannot reach or remove it, lift out the plants and rework the arrangement. A removable pot that drains outside the display is another workable root arrangement.
Some published methods include horticultural charcoal. It is not an essential ingredient in every setup and cannot replace restrained watering or correct a saturated bed. The simple removable-pot example below does not use it.
- Choose and fit the base separator Check particle retention, water passage, and edge coverage before planting.
- Decide whether to include charcoal Read its optional role and material limits.
Direct planting: prepare the bed, plant, and make the first check
For a first direct planting, one verified compact Fittonia keeps the job simple: remove its nursery pot and plant the rootball in the bed. The same sequence works for a checked compatible humid group, but adding plants requires the full shared-care comparison. This method has no pot outlet; follow the separate removable-pot example if you want to water and drain roots outside the glass.
Choose the position and test the opening
Use suitable indirect light for the chosen foliage and avoid direct sun heating the enclosed glass. Set the plants beside the empty container and test the full rootball and tool route. Change the vessel if you would have to crush growth or remove healthy roots simply to make it fit.
- Check the actual growing position Follow daylight and heating sun before choosing supplemental light.
- Test the vessel before filling it Pass the actual rootball and tools, then try future removal.
Gather and prepare just the direct-bed materials
Have the clean reachable vessel, identified plant, suitable peat-free humid-foliage medium, small-spout watering container, spoon, and cloth beside you. For the layered method, add washed coarse material and a water-permeable separator as described above. Buy enough growing medium to surround the actual rootball at its existing level, with headroom left above it; the jar size alone cannot give a useful quantity. Moss, decoration, and charcoal are optional. Wash and rinse the empty glass, clean tools, and gradually moisten the medium until evenly damp, without free water.
- Check the humid-foliage medium before filling Use the scoped starting mixture and ingredient functions, then check the product and actual roots.
Arrange plants and stable hardscape before planting
Put the largest growing footprint where it will remain reachable. Check views from the sides you will use, leave a route between plants, and seat small rocks securely without loading them onto fragile roots or stems. Omit wood or stones that obstruct later removal.
Plant each rootball at its existing level
Before unpotting, find the line where the nursery medium meets the stem bases. Make a hole that fits the rootball; support the roots from underneath as you ease the pot away. Set that original surface level with the surrounding bed, then backfill around the sides gently. The roots belong below the surface; the leafy stem bases and growing crown stay above it. Check from the side as well as above. If the rootball does not fit without burying stems or crushing roots, stop and change the container or planting rather than cutting healthy roots to fit.
Finish the surface and inspect water needs
Brush loose medium from foliage and glass, leaving an exposed edge where you can see and feel the root medium. Living moss is optional; keep any identified patch in contact with its suitable surface and clear of plant bases. Check the rootball as well as the surrounding mix before watering. If either needs water, direct a small amount to that area, pause for it to spread, and check again. Stop when the root area is evenly moist; do not keep pouring to create water in the bottom layer. If water pools below, stop and remove it; dismantle enough of the planting if there is no safe way to reach it.
Place the garden and observe it
Return the planting to the checked indirect-light position. Fit the removable lid for a closed garden, or retain the intended opening for a partly open garden. Note the starting leaf condition and root moisture. Look again over the next couple of days, and sooner if it overheats, water collects, or leaves decline: check the rootball, lower layer, and leaf bases before adding anything. Glass droplets alone do not decide whether to water. Open to correct excess moisture; move a hot display out of direct sun. Use the checks below to decide whether to leave it alone or intervene.
Keep the surface work within reach
A broad opening lets you position a small surface patch without dragging it through neighboring leaves. You can also leave the surface bare for easier inspection.
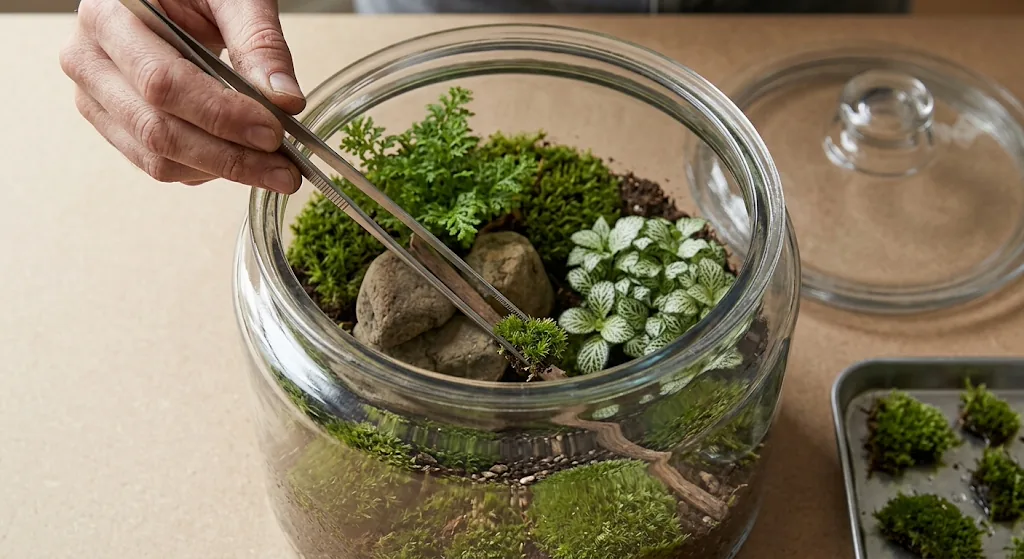
- Check living moss identity and surface planting Distinguish living plants from preserved or dried materials before using a patch.
Removable-pot alternative: one compact nerve plant
- Follow the complete nerve-plant care profile Check identity, dwarf-form limits, pruning, propagation, and symptom checks.
- Compare a shared humid planting before adding companions Use the specified members, planting zones, conditions, and conflicts rather than adding an arbitrary neighbor.
Build an open drying-succulent display
Use this for identified succulents whose roots need a drying cycle. Rainforest cacti and moisture-loving plants do not inherit this procedure.
Choose light and a real water outlet
Match the named plants’ light needs. Use a container with drainage holes, or removable draining pots inside broad open glass. In the latter case, plan to water outside the glass and empty all runoff. If pots cannot come out, choose a different vessel.
Prepare the growing pots
Use an appropriately sized pot and freely draining gritty cactus/succulent medium. Do not replace the root medium with a decorative stone stack or mix in wet moss. Keep enough space for the actual roots without surrounding a tiny rootball with a large volume of wet medium.
Evidence[6]
Keep the display open and water the roots deliberately
For Aloe vera, wait for thorough root-zone drying before watering; other named plants may have a different seasonal routine. When watering is due, lift the pot out, wet the roots, let excess drain, and return it to empty glass. Do not use the humid-bed top-up method or leave pots in runoff.
- Compare succulent light, growth, and shared care Choose named plants before building a shared drying root zone.
Build an open air-plant display with removable support
This is a soil-free display for an identified epiphytic Tillandsia. It needs a ventilated plant position and a complete route out for watering, not a lid over a wet planting bed.
Choose the support and test removal
Use a small stable branch or cork support, or a loose cradle that holds the plant without crushing its leaves. Keep the base visible and out of damp filler. Make sure the complete plant and support can lift out through the opening without forcing the leaves.
Set the open position
Place the support at a genuinely ventilated opening in bright diffused light, avoiding direct sun heating the glass. Leave space around the plant and inspect the actual mounting point. If its base remains enclosed, use an open support outside the jar.
Evidence[8]
Water outside the display
Remove the plant or whole support before watering. For an identified Tillandsia xerographica, NC State describes a 15-minute immersion; do not apply that duration to every species. Wet according to the named plant’s method using suitable room-temperature water, then gently release water trapped among the leaves.
Drain, dry, and return only when ready
Let a rosette drain upside down in an airy place and inspect its crown and leaf bases. Penn State specifies at least four hours outside glass before return; wait longer if still damp. This is a minimum glass-return wait, not proof of dryness or a timer for a continuously open hanging plant. Empty collected water and return the plant to the open support.
- Compare Tillandsia forms and their care routines Choose a suitable species, support, and watering/drying method.
Build a dedicated Venus flytrap display
This branch is for Dionaea muscipula, not every carnivorous plant. A removable pot in an open display preserves access for root care and seasonal moves; humidity alone is insufficient.
Choose the light and annual routine first
Provide the strong light flytraps need and keep glass from creating excessive heat. For ordinary seasonal culture, plan a cool bright winter resting position before planting. For the dedicated year-round indoor alternative, ICPS specifies 15,000–25,000 lux of white LED light for about 14 hours daily, with regular feeding. Keep that complete routine; an ordinary room shelf is not that setup.
Prepare the pot, tray, and nutrient-poor medium
Use a draining plastic pot you can remove from the display, with a separate shallow water tray. Use a flytrap-appropriate nutrient-poor medium: ICPS describes equal volumes of Sphagnum peat and suitable sand, while RHS also describes sustainably farmed long-fiber sphagnum as a peat-free option. Do not substitute preserved decorative moss or fertilized houseplant mix.
Retain the crown at the surface
Keep an established healthy plant in its appropriate pot when possible. If potting, moisten the medium with low-mineral water, support the roots below the surface, and keep the growing center and traps above it. Avoid repeatedly triggering traps while handling the plant.
Control water at the pot rather than flooding the jar
Use clean rainwater, distilled water, or reverse-osmosis water of suitable quality. Maintain moist medium with shallow tray water during active growth; keep the crown above the tray water. If following ICPS’s peat/sand tray method, its soil surface must remain more than 2 in. (5 cm) above the water level. Do not turn the whole glass container into an unmeasured reservoir.
Keep it open and preserve the seasonal move
In ordinary seasonal culture, move the removable pot to the planned cool resting conditions as growth changes in autumn; keep medium moist while reducing unnecessary standing water. The reviewed home-growing guidance gives roughly 35–50°F (2–10°C) and at least ten weeks of rest. Do not freeze an unprotected small pot or switch routines to force winter growth.
- Choose the flytrap’s seasonal or dedicated indoor routine Keep the conditions attached to the routine you actually intend to follow.
- Compare other carnivorous plant types before substituting Other pitcher plants, sundews, and butterworts can need different roots, water, light, or seasons.
Check the build during establishment
Inspect after assembly, after watering or changing the opening, and as the plants settle. Respond to the root zone and plant condition rather than a universal calendar.
- Persistent wetness or collected water
- Check the root zone and outlet
- Check
- Look below the surface and at the inner pot or tray. A few droplets on glass are not a root-moisture measurement.
- Action
- For humid foliage or succulents, stop adding water to wet medium and empty unwanted runoff; open a humid vessel to release excess moisture. A flytrap’s intentional shallow tray follows its separate routine.
- Stop or reassess
- Rework an arrangement whose excess water cannot be removed or whose roots remain saturated.
- Drooping or deteriorating foliage
- Check before watering again
- Check
- Inspect root moisture, light, heat, and recent changes. Wilting alone does not establish drought.
- Action
- Correct a demonstrated dry root zone using its plant’s method. If roots are wet, withhold additional water and inspect for damage. Remove decaying material and change an unsuitable position.
- Stop or reassess
- Continuing deterioration needs closer plant and root inspection, not sealing the problem inside.
- Growth blocks another plant or the opening
- Restore the maintenance route
- Check
- Look at the whole growing footprint and the path out, including the pot or support.
- Action
- Trim only as the plant’s care allows, or remove the outgrown plant. Reassess a changed combination rather than assuming the former arrangement still applies.
- Stop or reassess
- Move to a larger or simpler setup before plants become trapped.
Your next step
Continue your terrarium plan
More detail when you need it
- Check visible mold and recurring growthDistinguish surface debris from damaged living tissue, remove affected material, and know when to inspect the plant.
- Check a kit before starting the buildConfirm the vessel, live contents, growing medium and care route.
- Inspect new plants before assemblingCheck what arrives and observe it separately before it joins other plants.
- Choose the growing position and lightCheck daylight, fixture coverage, timing, and heat before filling the vessel.
- Choose a vessel with usable accessCompare openings, growing space, lids, and the route for water and maintenance.
- Choose a layout before assemblingCompare plant silhouettes, empty space, materials, and the route for later care.
- Observe the garden after establishmentDistinguish water recycling from a guarantee of permanent balance.
- Check a combination before assembling itKeep the specified members, planting zones, conditions, and conflicts with the plan.
Before you start
- Choose and prepare the root mediumCompare ingredient functions, scoped recipes, and the root arrangement before filling.
- Prepare a supply list for your planting methodCheck essential tools, conditional layers, springtails, and hardscape before assembly.
- Choose the environment before the containerCompare humidity, air, roots, light, and the work you can maintain.
Explore more in build
Sources and review
- Plants and Youth: Designing and Building a Terrarium · University of Florida IFAS Extension
- Terrariums and bottle gardens · Royal Horticultural Society
- How to Create and Care for a Terrarium · Iowa State University Extension and Outreach
- Fittonia albivenis — dwarf forms, moisture and pinching · NC State Extension
- How to grow Fittonia · Royal Horticultural Society
- How to grow houseplant cacti and succulents · Royal Horticultural Society
- Aloe vera — growing conditions · NC State Extension
- Air plants · Royal Horticultural Society
- Tillandsias as Houseplants · Penn State Extension
- Tillandsia xerographica — indoor watering and drainage · NC State Extension
- How to care for a Venus flytrap · Royal Horticultural Society
- How to grow carnivorous plants · Royal Horticultural Society
- Dionaea muscipula — light, roots, and seasons · NC State Extension
- Growing Dionaea muscipula · International Carnivorous Plant Society
- Venus Flytrap Dormancy · North Carolina Cooperative Extension, New Hanover County Center