Plants / Aluminum plant
Aluminum plant in a terrarium: grow, pinch, and renew
Plan for an upright clump of silver-marked leaves, with room to reach the stems and roots as it grows.
By Terrarium GuideSources & editorial method
Botanical identity: Pilea cadierei
The short answer
Pilea cadierei is a candidate for an accessible humid terrarium with bright indirect light, moist but well-drained roots, warmth, and growing room above and beside the clump. RHS specifically lists terrarium and bottle-garden use. Choose the actual specimen for the space; a small shop plant is not proof of a dwarf form.
Keep the lid openable and inspect crowded or persistently wet foliage. Pinch growing tips when you need a fuller, manageable outline, and move or renew an outgrown plant. Humid air does not make standing water safe, and published terrarium use does not establish permanent airtight care.
Choose a display you can keep maintaining
| Your display | Decision | What makes it workable |
|---|---|---|
| Openable closed humid terrarium | A candidate when the clump fits and leaves can be inspected. | Provide indirect light and moist aerated roots. Keep access to adjust moisture and remove crowded growth; a lid alone does not resolve poor circulation. |
| Partly open humid planting | A candidate with reachable roots and shoots. | Check actual room conditions and drying. Allow upright and lateral growth without shading smaller neighbors. |
| Removable pot inside glass | Useful when independent watering and removal simplify care. | Use a real drainage outlet, water outside the display, and empty collected water before returning the pot. |
| Narrow bottle or dry succulent bed | Change the container or choose another plant. | An inaccessible clump cannot be maintained; a root zone designed to dry thoroughly between waterings does not match this moist-root plant. |
Scope and important limits
A useful fit when
- Choosing and maintaining Pilea cadierei in an accessible indoor humid display.
- Keeping an upright clump within growing room, or renewing it from stem-tip cuttings.
Use another path when
- Copying these conditions to every Pilea or silver-leaved retail plant.
- A dry succulent bed, a miniature-size guarantee, or a permanently sealed maintenance schedule.
The display decisions apply published horticultural guidance to terrarium care. They are editorial analysis, not Terrarium Guide growing trials.
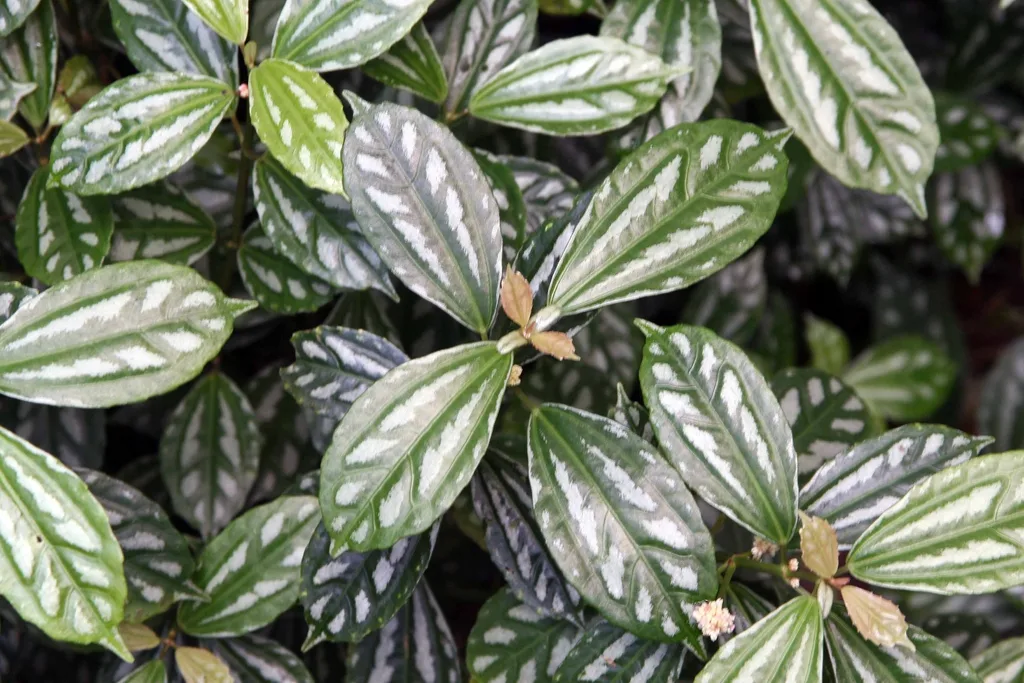
Recognize the silver patches; allow for the whole clump
This profile covers Pilea cadierei, sold as aluminum plant, aluminium plant, or watermelon pilea. Opposite, toothed green leaves have raised silver patches. Those markings describe the pictured species; they do not establish a dwarf cultivar. Chinese money plant, Pilea peperomioides, is a different plant with rounded leaves.
NC State’s quick identification notes give 6–12 in. (about 15–30 cm) height, while its dimensions field gives 9–12 in.; its reported width is 6–9 in. (about 15–23 cm). RHS uses broader 0.1–0.5 m size bands. These ordinary horticultural descriptions are not competing promises about your bottle: measure the plant and leave room for new upright and sideways growth.
UF/IFAS describes spreading groundcover in a shaded landscape. That outdoor behavior helps explain why the clump needs a reachable boundary; its landscape spacing and establishment time do not become a terrarium planting distance or growth forecast.
- Measure usable headroom and removal access Start at the finished soil surface and test the actual opening.
Choose a plant that fits before you buy
- Ask for Pilea cadierei and any cultivated-form labelDo not infer miniature adult growth from silver leaves, the word mini, or the nursery-pot size.
- Measure the rootball, canopy, and openingLeave room for new shoots, a visible soil edge, and a tool to reach the stems. Choose a wider vessel if the plant cannot be removed safely.
- Inspect new growth, leaf undersides, and stemsChoose healthy growth without withering, extensive discoloration, visible pests, or damaged stems. Inspect the rootball for congestion when you can remove the nursery pot.
- Keep the plant warm on the way homeCheck cold-weather delivery protection for an online purchase. Keep a locally bought plant out of cold drafts during transport.
- Compare sellers for a named aluminum plant Keep the identity and specimen checks above; compare seller information, arrival forms and delivery before ordering.
Plant with a visible root edge and reachable stems
Keep the existing planting level
Ease off the nursery pot and support the rootball while lowering it into a hole that fits. Set it at its existing soil level, backfill gently, and keep leaf-bearing stems above the medium. Do not bury healthy foliage to force a tall plant beneath the lid.
Evidence[7]
- Prepare the complete humid planting Keep Pilea’s inspection edge and growth clearance while preparing the vessel and materials.
Keep light, roots, warmth, and air as separate checks
Use bright indirect light and a warm position
Place the foliage in bright indirect light. Avoid direct sun on the plant and glass; a deeply shaded corner is not equivalent to a well-lit position without direct rays. If new growth becomes stretched, check the light reaching the leaves before compensating with fertilizer.
Cornell’s species row gives a minimum night-temperature range of 65–70°F (about 18–21°C). Use this as warm houseplant planning guidance and measure at the plant, especially near a cold window. RHS’s frost-free rating is a different kind of guidance, not a preferred indoor temperature or a tested bottle-survival limit.
Water the medium after checking its actual moisture
Check an accessible rootball edge and the medium around it. Keep it moist without standing water. RHS’s general Pilea pot guide waters as the upper compost starts drying; a shallow humid terrarium can dry differently, so inspect the roots’ medium rather than copying a fixed surface depth or weekly schedule.
For a removable pot, water outside the glass, let it drain, and discard collected water. For a bed without an outlet, add water in small amounts and reassess before adding more. Condensation on glass cannot establish whether the rootball is dry or saturated. Reduce water as growth and drying slow.
Retain humidity without crowding wet leaves
Humid air supports this plant, but keep leaves separated enough to inspect them and allow air movement. Open an excessively wet enclosure and check the foliage and medium; no reviewed guidance supplies a universal lid-opening interval.
Feed conservatively during active growth if needed. RHS’s Pilea guidance uses occasional balanced liquid feed at the product’s dilution rate. A confined terrarium is not a reason to increase feeding to correct every weak or yellow leaf. Check light, roots, and growth first; do not feed an unhealthy wet planting to force recovery.
Pinch for space; renew a tired plant from healthy tips
RHS’s species profile says no routine pruning is required. NC State recommends pinching tips for compact growth. In a terrarium, use the actual canopy and access to decide when intervention is useful.
Shorten a reachable growing tip
Find a healthy pair of leaves attached to the same stem: that attachment is the node you will keep. Follow the stem toward its tip and place clean fine scissors just above that pair, on the tip side. Support the stem and leave the node and leafy growth below on the plant. Remove the cut piece and fallen leaves, then reassess the outline before cutting more. If the cut cannot be reached cleanly, take the plant out.
Root selected healthy tips separately
RHS names P. cadierei for softwood stem-tip cuttings in spring and summer. For a cutting, the node must stay on the detached tip: cut on its base side, below the leaf attachment. This is the opposite side of the node from the above-node cut used to shorten the parent. Remove lower leaves that would sit in the mix, then insert the prepared base into a separate pot of gritty, free-draining peat-free medium. Keep it warm in bright indirect light, humid and suitably moist until rooted; keep foliage above the mix. Inspect for decay and gradually increase ventilation once roots establish before moving to a less humid position. Do not scatter cuttings into an already crowded bed.
Keep the healthy replacement, change the space when necessary
Move a rooted replacement into the display only when its identity, roots, size, and growing conditions fit. RHS suggests replacing woody, weak bushy pileas from propagated plants. This is an option, not a requirement to discard a healthy plant each year. Move an outgrown clump to more space when cutting back no longer preserves access.
Inspect the plant before treating a symptom
| What you see | Check | First action |
|---|---|---|
| Drooping or falling leaves | Feel the rootball and check warmth, light, and recent changes. Cornell notes leaf drop from dry soil. | Water a drying root zone gradually. If already wet, stop adding water and inspect drainage and roots outside the display. |
| Yellowing, soft stems, or decay | Look for persistently wet medium and standing water; color alone does not identify the cause. | Empty collected water and remove decaying material. Take out a declining plant for root inspection rather than closing it in and adding more water. |
| White material on leaves | Check location, distribution, and whether separate insects or damage are present. Silver patches are normal; a new powdery coating needs inspection. | Separate the affected plant for inspection. Reduce crowding and prolonged wetness; do not identify every white mark as mildew or spray a treatment into the whole display without identifying the problem. |
| Stretched, sparse, or leaning growth | Check actual light and whether the canopy is shaded or touching glass. | Improve indirect light without direct sun, then trim reachable crowded shoots or renew a weak plant. Existing bare stems do not become leafy merely by adding water. |
| Insects, fine webbing, or damaged new leaves | Inspect undersides and stem joints. NC State lists mealybugs, scale, aphids, and spider mites to monitor. | Remove the pot or plant to isolate it and identify the pest. Inspect neighbors before returning it; use a treatment appropriate to the identified pest and product instructions. |
- Inspect a declining rootball and stem base Use supported handling when wet roots or soft stems need closer inspection.
Allow a taller clump beside lower foliage
Pilea’s upright foliage can provide a different height beside a lower plant, but allow the expanding canopy its own light and reachable edge. Compare each neighbor’s root moisture, temperature, and maintenance before sharing soil. A humid-air label does not establish a compatible planting.
Keep groundcover away from the stem bases and do not allow Pilea to shade or trap a neighbor. A separate pot can simplify watering and removal, but it cannot fix incompatible light or shared air. A succulent needing a drying root zone belongs in another care arrangement.
Pilea’s role in the Fittonia–Pilea pairing
Plan summary · read the complete conditions
Fittonia and Pilea in a partly open humid display
Fittonia and Pilea can share indirect light and moist, drained soil in a partly open humid display. Use them together only when their actual footprints, gentle airflow, and reachable pruning or removal routes fit the layout.
Layout: A partly open humid display with shared soil, measured around the two actual plants.
- Fittonia albivenis
- Pilea cadierei — Upright leaf focal point
Use the conditions with the advice
Your next step
Compare conditions and companions
More detail when you need it
- Arrange a reachable low-and-upright bedCheck growing room and access in the specific Fittonia–Pilea shared-bed direction.
- Read the full partly open companion planKeep its members, planting zones, shared conditions, and management together.
- Compare openable closed-display choicesUse the distinct enclosure conditions and leaf inspection requirements.
- Read the lower-growing Fittonia profileCompare its growth, root care, and maintenance before choosing a neighbor.
Explore more in plants
Sources and review
- Pilea cadierei — foliage, indoor culture, and problems · NC State Extension
- Pilea cadierei — terrarium use and species profile · Royal Horticultural Society
- Pilea cadierei Aluminum Plant — landscape growth context · University of Florida IFAS Extension
- Growing Requirements for Foliage House Plants — Aluminum Plant row · Cornell Cooperative Extension of Monroe County
- How to grow pilea — buying, pot care, and named propagation methods · Royal Horticultural Society
- Softwood cuttings — preparing and inserting stem tips · Royal Horticultural Society
- How to Create and Care for a Terrarium · Iowa State University Extension and Outreach
- Terrariums — existing reviewed planting and environment guidance · University of Missouri Extension
- Fittonia albivenis — companion evidence · NC State Extension
- Fittonia — companion evidence · Royal Horticultural Society
- Indoor Plant Care — existing companion ventilation context · Purdue University Extension
- WFO Plant List — pinned 2026-06 identity · World Flora Online